My MacPro 5,1 Upgrade Journey
This document describes my journey with the Mac Pro (Early 2009), originally a 4,1 flashed to a 5,1. I will ry to include some of my findings and some for people to follow along this journey if they wish to buy a used Mac Pro or upgrade to a working Mac Pro in 2020. This machine still works very well for being 10+ years old. I will try to include as many videos as possible that i have used as a reference (My YouTube playlist is added below). Before we start a quick disclaimer as always.
Disclaimer: Try the things mentioned in this documentation at your own risk. I do not guaranty that this will work for you but I hope it does. This is purely for educational purposes and I am not responsible for any void in warranty. This is not a end all be all guides. These steps have worked for me but there might be additional steps that might be required for getting things to work on your end. Please follow the links mentioned in the the
Useful Linkssection below for more update to date information about the community postings on this topic.
About my Mac Pro 5,1
My MacPro has the following configurations at the moment:
- Processor: 2 x 3.33 Ghz 6-Core Intel Xeon (X5680)
- Memory: 96 GB 1066 Mhz DDR3 ECC
- Graphics: AMD Radeon RX 580 8 GB
Contents
Purchase
If you already have a Mac Pro skip to the next section. Let me go through my buying experience. I saw a posting on Facebook Marketplace for a Mac Pro Early 2009. After a quick and simple negotiation I got it down to $175. Here are some of the images from the post and from the negotiation.
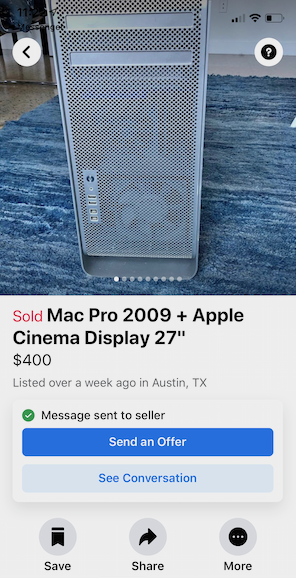
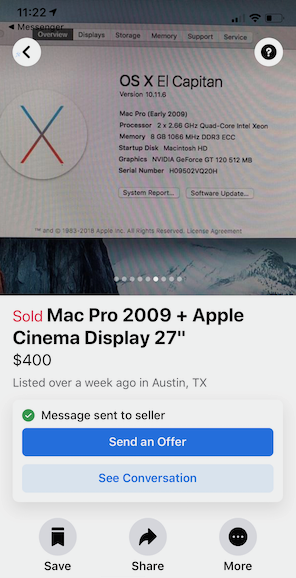
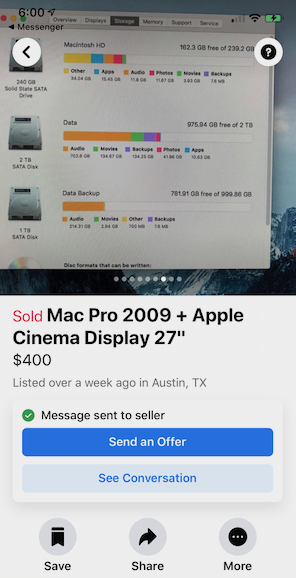
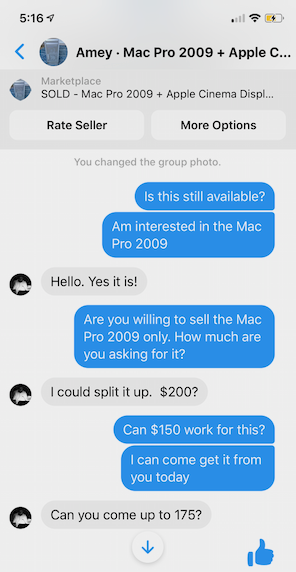
Personally I think that the fare price for this kind of system is below $250.
My Upgrade Journey
Now this resulted in my upgrade journey starting with a lot of research work! I did lot of the reading and searching online but never new of this fb group Mac.Pro.Upgrade. I would recommend every one on however far in this journey to join this group.
One thing that has been very helpful throughout this journey is the Mac Pro Technical documentation which can be found here. I will try to point out some of my findings so that folks following along will not have to do the similar research.
Flashing the 4,1 to make it 5,1
I began by flashing my 4,1 to 5,1 It was a farley simple process. I will link the iFixit Guide here
The steps include:
- Download the Tools & Upgrade to macOS 10.11
- Disable SIP (System Integrity Protection)
- Run the Firmware Upgrade Tool
- Shut Down & Flash
The onscreen tutorial will guide you through this process.
Difficulty Level: Easy
Time Required: 10-15 min
Videos:
- https://www.youtube.com/watch?v=nwxxjmthRbs
CPU Upgrade
I upgraded to a Intel Xeon 3.33GHz X5680 processor as this is the best value for money processor. The most powerful CPU that can put in this computer in a single or dual configuration is Intel Xeon 3.46GHz X5690.
- Intel Xeon 3.33GHz Hex X5680 - Amazon (Will need to be de-lidded) / Ebay
- 3 MM allen wrench - Amazon
- Thermal Compound Paste - Amazon
If you are upgrading a Mac Pro 2010. Then you don’t need to buy de-lidded CPUs.
Difficulty Level: Medium to High
Time Required: 15-30 min
My Benchmarks:
https://browser.geekbench.com/v5/cpu/3033105
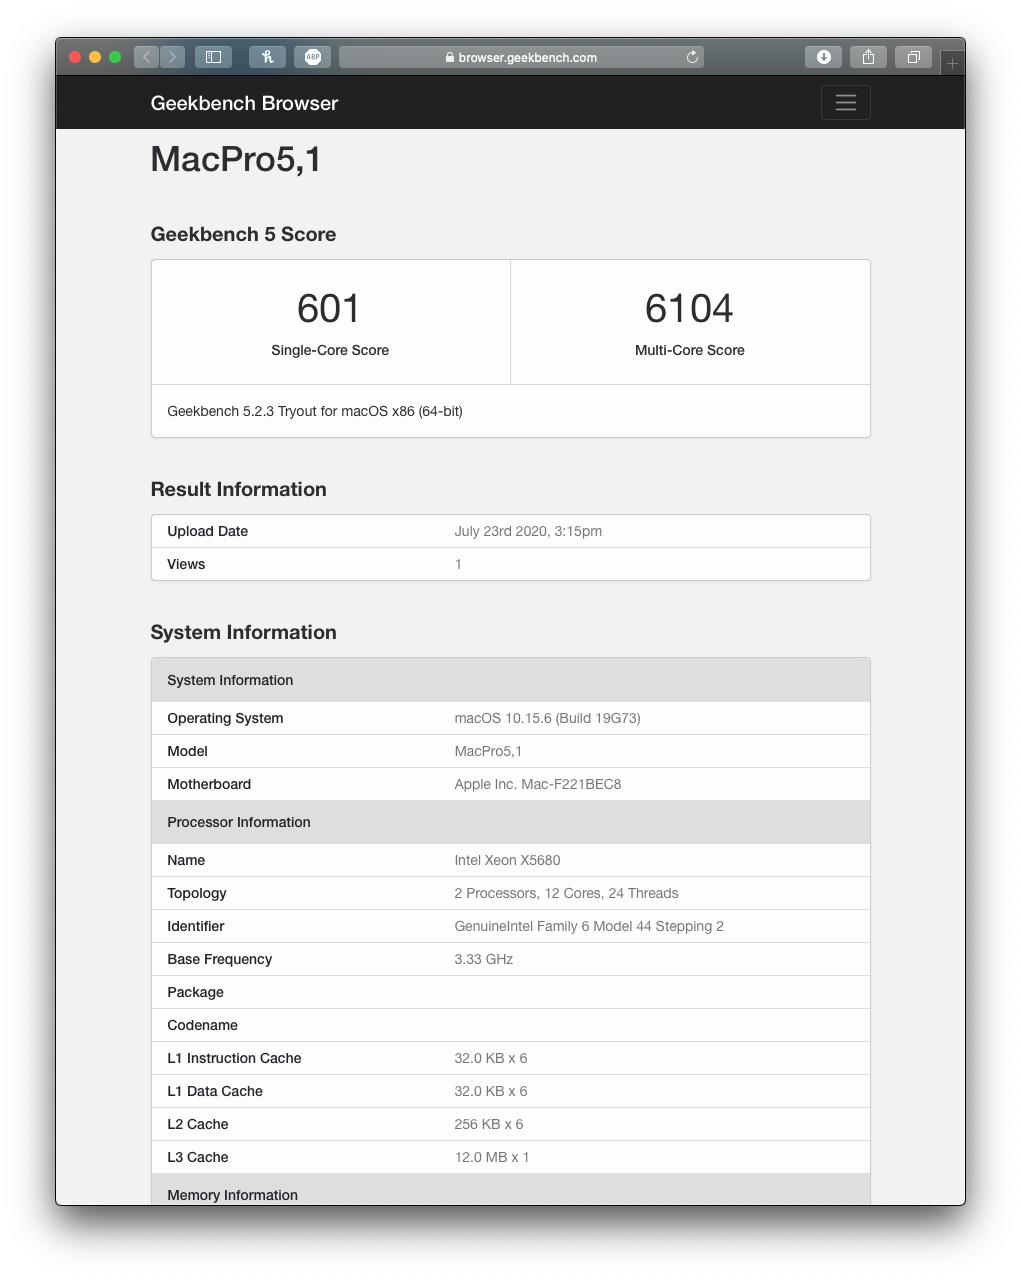
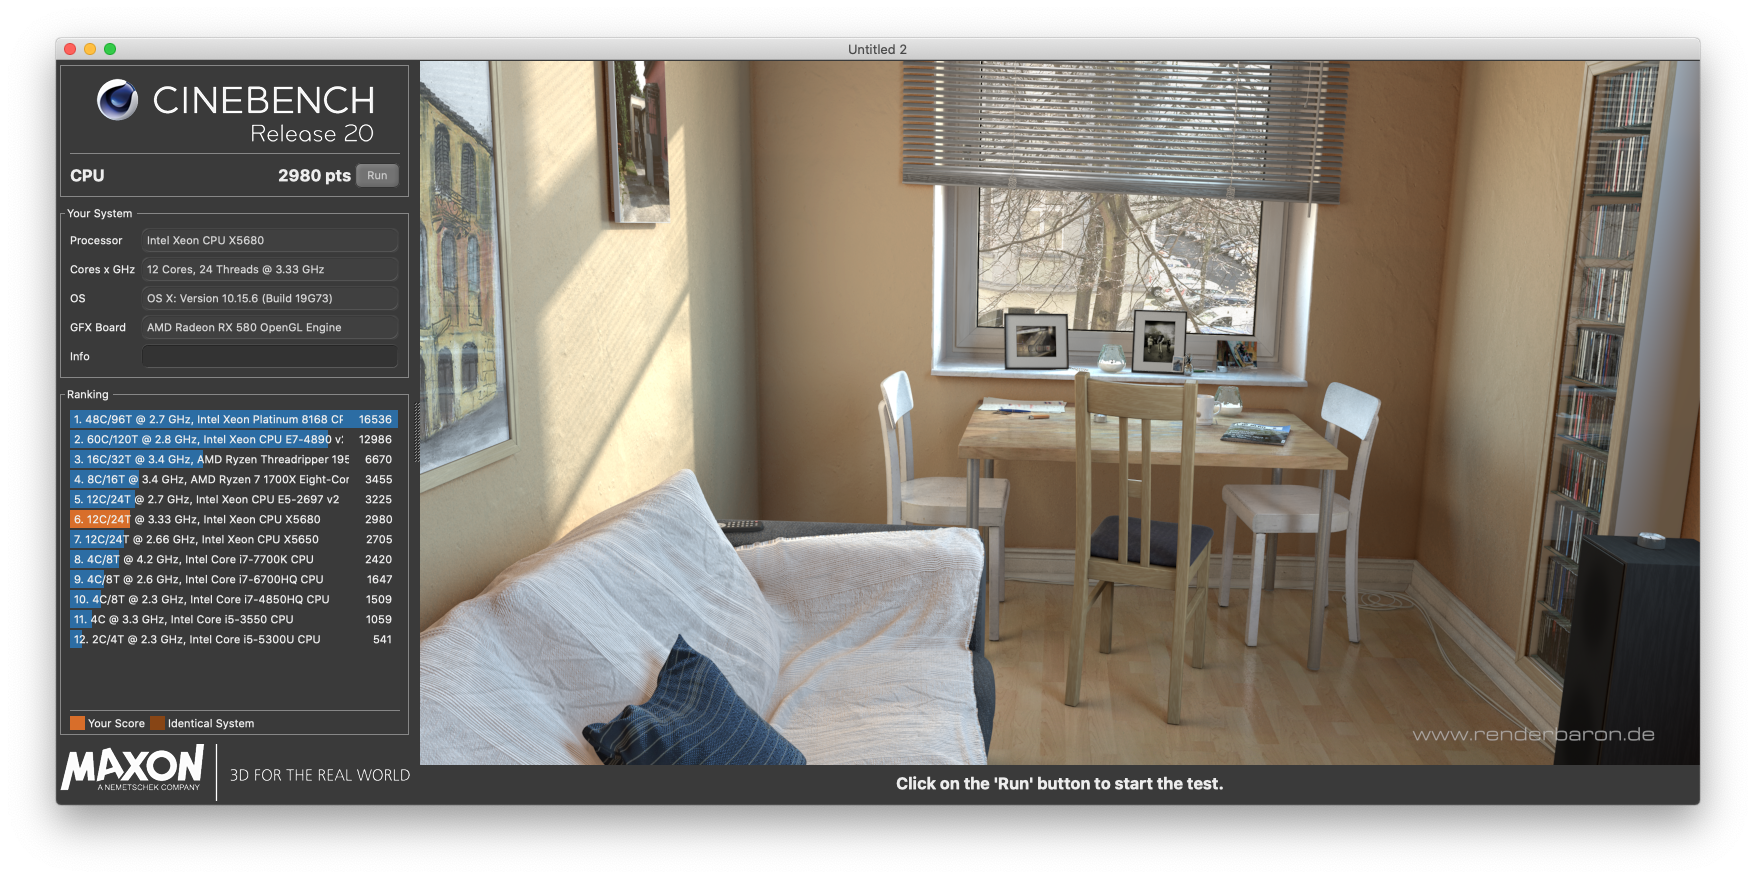
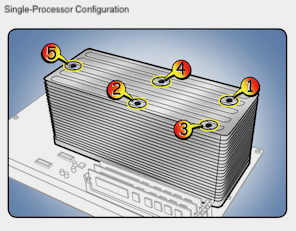
Finding: Processor screws need to be tighten quite a bit. After if the Mac Pro is not booting keep tightening the screws quarter turn at a time till the system does not boot. Always tighten the screws in a criss cross pattern. The recommended sequence is shown below:
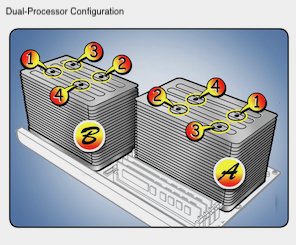
Recommendations: There is another processor the Intel Xeon 3.06GHz X5675 which could be another option that can be explored if you want to run this all day and you want to save on some electricity bills. The X5675 runs as 95 W TDP as compared to the X5680 and X5690 which run at 130 W TDP.
Videos:
- https://www.youtube.com/watch?v=xaZAUAXcVYc&list=PLxp0TMbVUXVdJB6w814mdMIXP2C-k_3Tx&index=2&t=0s
- https://youtu.be/9U5R0qyDF3g?t=927
- https://www.youtube.com/watch?v=7O-FQgeaBE8
- https://youtu.be/3sDZXpTP5ww?t=334
- https://youtu.be/3Z2ZSie7zeU?t=308
- https://www.youtube.com/watch?v=8cVhURcpi64
RAM Upgrade
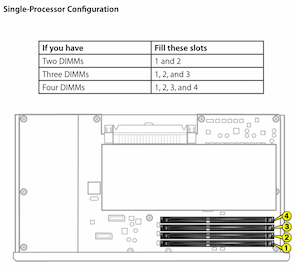
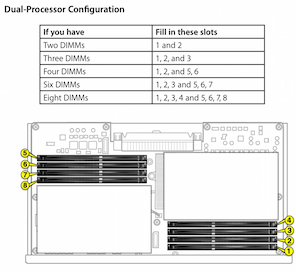
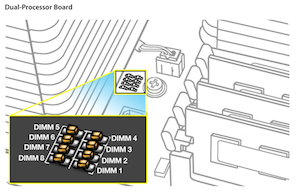
I recommend using only 3 out of the 4 bays to get the maximum speed out of the Mac Pro using 2Rx4 PC3 - 10600R DDR3 memory
There are a sequence in which RAM modules needs to be inserted into the slots here is explained in the diagram below:
Difficulty Level: Easy
Time Required: 5 min
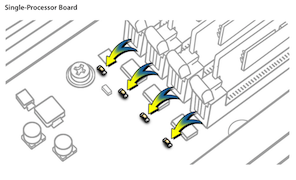
Finding: Try to fill in 3 channels (6 DIMMs) for maximum performance of your Mac Pro. If any of of memory sticks are faulty you will see the respective LED light up on the CPU Tray.
GPU Upgrade
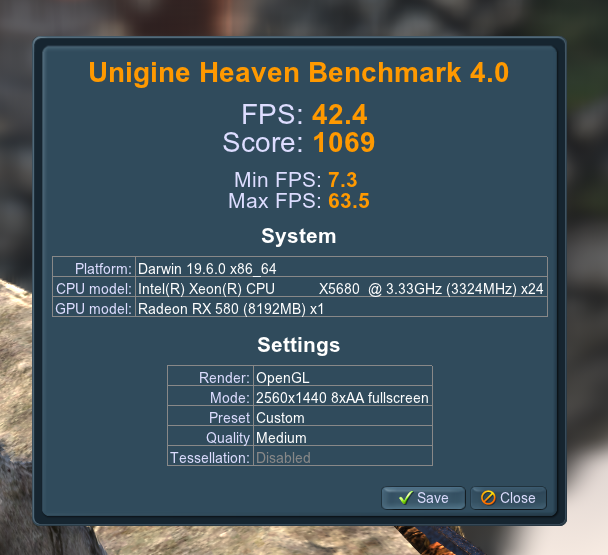
The GPU that I decided to go with was the RX580. This was the only one at the time that took about 225 Watts of power. This can be supplied by the Mac Pro without any modification and gives decent performance and also allows Mac Pro to run Mojave. I used the following part for the upgrade:
- Sapphire Radeon Pulse RX 580 8GB GDDR5 - Amazon
- Dual Mini 6 Pin to 8 Pin PCI Express Video Card Power Adapter - Amazon
Finding: Once you replace your GPU you will loose your ability to see the boot screen to enter into recovery mode. I would recommend keeping that old GPU around if you ever need it. You can possibly OpenCore your system to get a boot screen. Refer to the Thunderbolt 3 section below to see how you can do that.
My Benchmarks:
Videos:
- RX 580 - Amazon - https://youtu.be/Dv73HrnsNkw
- XFX AMD Radeon VII - Amazon - https://www.youtube.com/watch?v=rz9M_epdtxI (This will require modding your system with a PixlarMod or using an external power supply as the dual mini 6 pins can only supply 150W of power.)
PCIE SSD Upgrade
I used the following PCIE Card and SSD for my upgrade. This upgrade is similar to adding a Graphic Card into the system refer to the Videos below.
- NVME Adapter with Heat Sink, M.2 SSD Key M to PCI Express Expansion Card - Amazon
- Samsung 970 EVO SSD 1TB - Amazon
My Benchmarks:
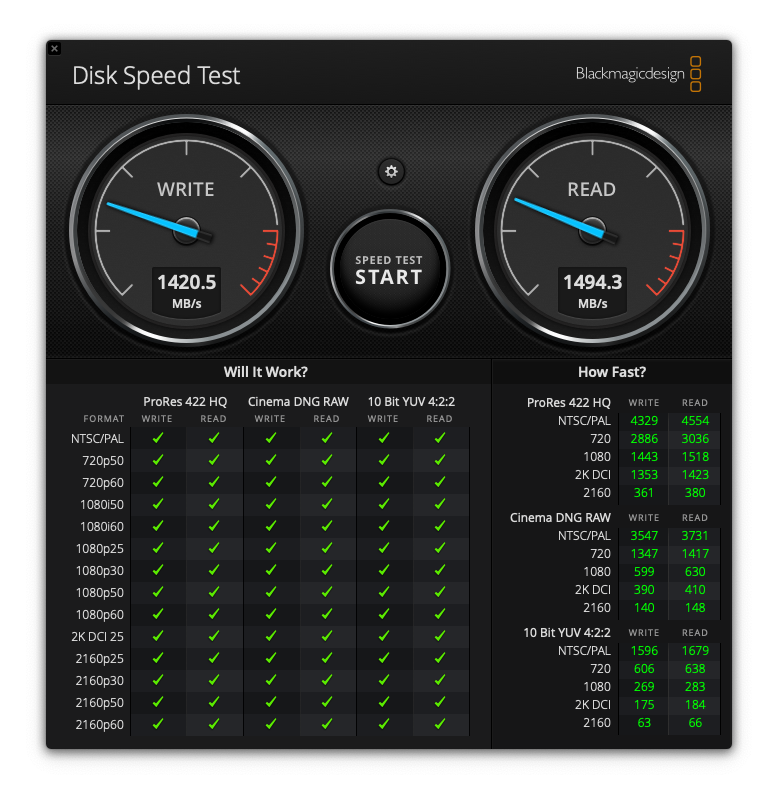
Finding: Using this kind of cheap M.2 NVME adapter will limit limit your speed to around ~1400 Mb/s readd/write. If you need some thing more powerful I would recommend the following cards which can give much higher speeds but need to support support Non-Bifurcation motherboard. Here are some of the recommended cards which are slightly more expensive:
- High Point SSD7101A-1 NVMe RAID Controller - Amazon (Reported speeds > 4400 Mb/s RAID0 with 2 Drives and > 7100 Mb/s with 4 drives)
- Syba I/O Crest SI-PEX40129 Dual M.2 NVMe - Amazon (Reported speeds > 4100 Mb/s RAID))
- Ableconn PEXM2-130 Dual PCIe NVMe M.2 SSDs Carrier Adapter Card - Amazon
- Sonnet SSD M.2 4x4 PCIe Card [Thunderbolt Compatible]
Cheaper Cards with lower speeds:
Details on all tested cards: https://forums.macrumors.com/threads/pcie-ssds-nvme-ahci.2146725/?fbclid=IwAR097vYoy4I6C8S7cUng5NcSyJA6_UBv0Yg-rYopu8e7pJEyL0Ooum-N71E
Recommendations: start off with a upgrade using a cheaper card and then move on to buying a more expensive card if you really need that extra performance.
Videos:
- https://youtu.be/A8hPC_DDq6Q
- https://youtu.be/fo7lVMfXq1c
SATA SSD Upgrade
Though I have a SSD in my system i wound not recommend this as your primary boot disk as this will not give you the required performance gains. The SATA port will cap the max transfer to around 340 Mb/s.
Finding: None
Recommendations: I would recommend using these drives bays to add backup spinning drives to which can be configured in Stripe Set (RAID 0) or RAID 1 based on your data protection requirements.
This is very easy to do I would recommend following one of these upgrade videos:
- https://youtu.be/2gqkGPidI84
Wifi and Bluetooth Upgrade
I would highly recommend this upgrade as this will enable faster WiFi AC (5) standard and Bluetooth 4.0 standard. A full upgrade story can be found here This will allow functionality such as Airdrop and unlock with Apple Watch (Series 3+). I used the following part for the upgrade:
- Mini PCI-E Adapter - Amazon
- UFL/u.FL/IPX/IPEX RF Coaxial Extension Cord - Amazon
- WiFi Bluetooth Card BCM94360CD - Amazon
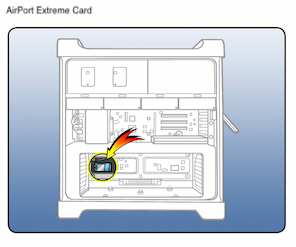
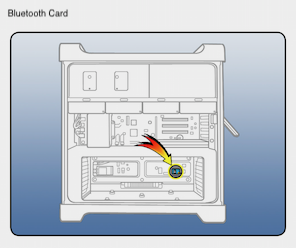
The bluetooth and the Wifi (AirPort Extreme) Card location from the documentation can be found below:
Difficulty Level: Easy to Medium
Time Required: 30-45 min
Videos:
- https://youtu.be/JtjZKfioOHY
- https://youtu.be/d9xPvreK8tg
Adding Thunderbolt Support
I added Thunderbolt support to my with a Gigabyte GC-Titan Ridge Card a full guide can be found here
Useful Links
- http://blog.greggant.com/posts/2018/05/07/definitive-mac-pro-upgrade-guide.html#thunderbolt
- https://www.facebook.com/groups/Mac.Pro.Upgrade
Videos
- https://www.youtube.com/playlist?list=PLxp0TMbVUXVdJB6w814mdMIXP2C-k_3Tx